Showing posts with label crafting. Show all posts

Tuesday, November 11, 2014

keep calm craft on [crafting on]

It has been much too long since I linked up with Nicole at Frontier Dreams for a Tuesday crafting post. But I have been crafting up a storm lately, mostly sewing, and when I haven't had time to actually be sewing, I have been scheming and dreaming about it. I always feel a strong urge to once again take up crafting when the temperature drops and winter settles in, and this year was no different. I have so many projects I want to start, and way too many started already that it was almost hard to chose what to share this week.

Last week on Instagram I shared some bonnets I've been working on lately. I have more to share about that in another post, today I'm focusing on a little play mat/quilt I finished for Raina recently.


I used scrap blocks from a quilt I made for my niece two years ago and some extra minky I had for the back. I quilted it myself, which was an interesting experience since I was too impatient to wait until after I could run to the store for a walking foot. There is quite a bit of puckering in a few places but it was a great learning experience and it just adds to the charm. I also machine quilted the binding on, which I figured was just fine for a play mat.

I love how it turned out and it's nice to have something that's thick, soft and cozy for her to play on, especially during the winter on our cold floors!


KCCO link up: "The act of creating, in one form or another, preserves my sanity amongst the chaos of life. This explains why I always have more than one project going at a time as well as why my housework tends to fall behind." - Frontier Dreams

Wednesday, April 2, 2014

DIY distressed wooden cable reel end table


Last week Steve brought a small(ish) wooden cable reel home from work with plans to make it into a table for our living room. I was excited to see how it would turn out, and after working on it for a few hours each day for two days, he was finished. I am so in love with how it turned out and am so thankful to have a husband that is so crafty! I feel like he can do just about anything around the house if he sets his mind to it.

Of course he did have a very special helper to make the job go a little bit easier:

Like I said, I love how it turned out and thing it fits in with the rest of our furniture/style just perfectly. It was actually a 'new' cable reel and we wanted more of a distressed look, so Steve sanded it and used coffee grounds to give the top a more weathered look. He also added some copper details inside the reel, which I think really make the piece. We're trying to decide if we should distress the copper so it gets that 'green' look (like an old penny) or if we should just leave it be.

*ps don't judge the 'theatre' style seating, we pulled the chairs onto the middle of the rug when Steve first brought the table in to see how it looked and that's when I happened to get pictures. We typically have a much more normal seating arrangement in the living room, haha.


I have my appointment today at the midwives and am 98% sure I'll have an ultrasound too, which I'm excited about. I'm just hoping that everything is normal and healthy and that my uterus just happened to grow fast for some reason (more info in my weekly update, here). Happy Wednesday!

Tuesday, November 19, 2013

Thanksgiving crafting with Riggs


Riggs and I did an easy little Thanksgiving-themed craft today together and it was fun! I realize now looking at these pictures that we forgot the poor little turkeys feet! Maybe we'll add them tomorrow.

Riggs loves it when I trace his hands and feet, so I thought I'd trade his hands on colored paper and use them for feather on a pilgrim turkey! He colored on the papers as I was cutting out all the hands, and helped me glue some of the paper together. He also ran around a little bit and played with his car while I was cutting out the pieces for the turkey's body and face. I was actually surprised at how much fun I had working on such a simple little craft, haha.

Daddy was home from work early because of the cold (-20 when he left his work around 10am!) and took some pictures for us. And yes, in case you were wondering, I wore my pjs all day long. 


big smiles while I was tracing his chubby little hand

he was so excited to be able to use the glue stick

our turkey is finished! He waved it around and smiled and laughed and kissed it a few times before
throwing it on the floor and moving on to something else. True toddler behavior right there ;)

I hung it in his room and when I put him in his crib for his nap he laughed and pointed at it.
Glad it brought him a little bit of entertainment, and I had fun working on it with him!

Later we snuggled in together for some reading. It was truly a lovely day. I'm feeling a little bit of cabin fever from being cooped up in this cold. It never got warmer than -15 today, and that's just a bit too cold to take Riggs out in for more than 15 minutes. Just going out to do the chicken chores burned my throat and nose so bad! I hope it warms up soon so we can get back to our outdoor routine! How do you keep busy inside with a toddler when the weather just doesn't cooperate with outdoor playtime?


Tuesday, October 22, 2013

paper garland for fall


Early on in October, I saw this blog post for a DIY paper garland from Amanda over at Happily Ever After and I put it on my mental to do list (check out her blog for instructions and much cuter pictures). I finally got around to getting some card stock and went to work cutting out circles yesterday. I have a little circle cutting tool that made it pretty easy and I may have even cut out some red, green and white circles for another upcoming holiday...


When I was finished sewing them up, I hung them up in Riggs' room to go with his fall/halloween books and his little pumpkin 'bag' (what he calls it) he picked out at the store last week. I think it turned out pretty dang cute :)


Wednesday, September 25, 2013

fall craft: dried leaf garland


Riggs and I always go for a walk first thing in the morning. Never do I enjoy it more than in the fall, when it's still quite cold and frosty outside and the grass crunches under our feet. I love to look around and see all the different changes, each day there is more variety in colors with much less green and much more yellow and red.


I search for 'perfect' fall leaves, basically any that stand out and stir something wonderful inside me. It's been very special to share my leaf hunt with Riggs, who is very interested in looking around outside and touching everything that seems interesting. I make sure not to show him my most favorite leaves, however, since he's not too gentle when he picks them and they often end up torn in half and then thrown to the ground with a spirited 'Uh-oh', when he sees they've been ripped. 

Last week I gathered a few of my most favorite leaves during a morning walk, and I brought them in to dry and press. I love to decorate the house with subtle little signs of the season, especially during fall and winter, and I thought a dried leaf garland would look especially in the kitchen window. 

Supplies:
lovely colorful leaves with the stems still in tact (as many as you think you'll need)
a few sheets of paper towel
thick, heavy books
yarn or twine
patience while they're being pressed

1. go on a walk and gather leaves that speak to you in some way or another
2. bring them in and gently pat them dry
3. carefully tear or cut the paper towel sheets to match the size of your leaves
4. sandwhich them gently between two pieces of paper towel
5. place in the pages of a very thick book
6. set somewhere where they won't be disturbed (or put in the oven)
7. after a few days, gently check to see that they've completely dried and pressed. If they're ready, carefully tie the twine or yarn around their stems in even increments. 
8. hang somewhere in your home and enjoy :)

Tuesday, September 24, 2013

crochet pattern for chicken saddle/apron/sweater


Have you ever heard of a hen saddle or a chicken apron? If not you will learn all about them today! 

There are multiple reasons why a chicken will have missing feathers, from molting to over-mating to mites to pecking. Often times one problem will lead to another, which is the case for my poor girl, Clucky. She was 'thrown in' for free when I purchased my other three chickens - and let me mention here that I made a rookie mistake when I picked them all up. I let myself be bullied into buying them even though they weren't what they had been advertised as by the seller.

When I arrived at the seller's house, I realized that her chickens weren't pets at all and that they had definitely never free-ranged (something the seller had told me they were used to when I mentioned to them over the phone that that's the kind of chickens I was interested in). About 20 chickens were stuffed into a barn stall that had been (poorly) adapted as a chicken 'coop'. As I said, my mistake is that I didn't have to buy the four chickens I had come with the intention of purchasing. But I felt all weird and pressured and awkward and handed over my money anyway, despite not feeling the best about the situation.

I had been under the impression that I was purchasing two laying hens (the two Buff Orpingtons) and two pullets (the Black Austrolorps). The seller said she decided to give me Clucky for free since she was older and might stop laying soon (probably also because she's not even a full Buff, she's some sort of mix). She also mentioned that the two Buffs were 'molting', which isn't the biggest deal, except that most chickens don't lay when they're molting. So I wasn't getting two laying hens at all. I mean yes, they would eventually start laying again, but the pullets would probably lay before them, which completely defeated the purpose of purchasing older, 'laying' hens. 


Anyway, I could go on about that whole situation, but the reason I mentioned all of this in the first place is because while both Buffs did show evidence of molting, they both also showed evidence of over-mating. Since I've had them I've increased their protein intake to help them grow their feathers back faster and Duchess has nearly grown all of hers back in. But poor Clucky hasn't been able to, because she's at the bottom of the pecking order (literally). 

Luckily, there's a simple way to protect the raw skin from pecking so that the new feathers have a chance to grow in - a chicken saddle! There are many different 'designs' for chicken saddles/aprons, but they all pretty much boil down to the same thing: a piece of fabric covering the raw skin held on by loops around each wing.

First you need to measure your chicken to make the right size saddle for them. Clucky is on the small size so it was especially important to measure her instead of going with general measurements based on breed. 


First measure from wing to wing to get the width in inches you need to cover with your saddle. The fabric needs to tuck under the wing at least an inch to be held down correctly. As you can see Clucky's saddle needed to be about 6" wide.

Next measure from the base of your chickens neck to the base of their tail feathers. Clucky's saddle needed to be about 7" long.

You can adjust the size of your apron based on what parts of the back need protection. Clucky is missing feathers all the way down to the base of her tail feathers so her saddle needed to be as long as possible.

Supplies

You will need about half a skien of worsted weight yarn. Wool is best, with cotton as the next best option. (I wouldn't recommend using red yarn since chickens are attracted to red things and like to peck them...sort of defeats the purpose ha)

Size 'I' crochet hook

yarn needle (for weaving in your ends)

an hour (at the most) to snuggle in and get to work!

Pattern

*based on Clucky's measurement and my personal gauge - after you chain 26 you can measure it and see if it will be wide enough for your chicken

// Chain 26, turn and hdc (half double crochet) in original 25 scs. 
// CH (chain) 1, turn and hdc in previous 25 stitches.
// Continue until you've reached 90% of your desired length.
// Decrease by one hdc on the end of each row for the last 10%, an inch at the most (as you can see from my picture, I decreased earlier, but it ended up not being wide enough to stay put so I had to go back and fix it).
// On your last row, continue past edge to chain 20 and join to other side using a slip stitch. 

// Slip stitch through next 5 st (back down the body of the saddle), chain 30 (making another loop), and sl st in last 5 stitches. 
// sl st around the rest of the saddle to make a more uniform edge (this step is optional - it is only a chicken garment, after all).
// Fasten off, and weave in tails.

*obviously, I am not a professional pattern writer. I apologize profusely for the pure badness of this pattern. Luckily, this should be a really, really easy project and should be easy to figure out once you get going and from looking at my pictures. If you have questions don't hesitate to include them in the comment section and I'll answer as soon as I can! 

To put on:
20 st loop goes around the neck/chest
30 st loop, gently pull wings up through it, one at a time, so that it can rest under the wings to be held in place. Loop should rest around the chest. They shouldn't be too tight, make sure you can easily slip two fingers inbetween the loops and your chickens chest.


Clucky sort of hopped around and pecked at the saddle for a few minutes, then seemed to forget about it completely. When you bird hops and runs around, the saddle can get out of place, but after a day or two it should settle down where it belongs. Also, they should be able to go about all their normal activities...Clucky was in her dust bath about an hour after I put the saddle on her.

Let me know if you have any questions and any additional feedback (help with the pattern lingo, please?!) would be greatly appreciated!

Linked up with Nicole at Frontier Dreams for Keep Calm, Craft On {crafting on}.

Tuesday, July 2, 2013

DIY American Flag tee for toddlers


I've been searching for a cute American flag themed t-shirt for Riggs for I don't know how long. I wanted him to have something patriotic to wear to BBQ's and for pictures. There are lots of flag/patriotic shirts out there, but I didn't want something with words, slogans, brands, ect so basically I couldn't find anything. I sort of gave up and let it drop.

Then I was reading a few of my feed on bloglovin' this weekend, and I saw this DIY 4th of July shirt on Amy's blog, keepin' up with the Smith's. Why hadn't I thought of doing it myself before?! I went straight out and got some supplies for making a few shirt for Riggs - fabric paint and white tees. I wanted a white tank but I couldn't find any in his size and then I found these little Gerber tees on sale so I just grabbed them. During Riggs' naptime, I pulled everything out and got busy DIY-ing.

SUPPLIES:
blue & red fabric paint
 t-shirt or tank
paintbrush (I used paper towel bc I wanted a more 'spongy' look)
painters tape
thick scrap paper

#1
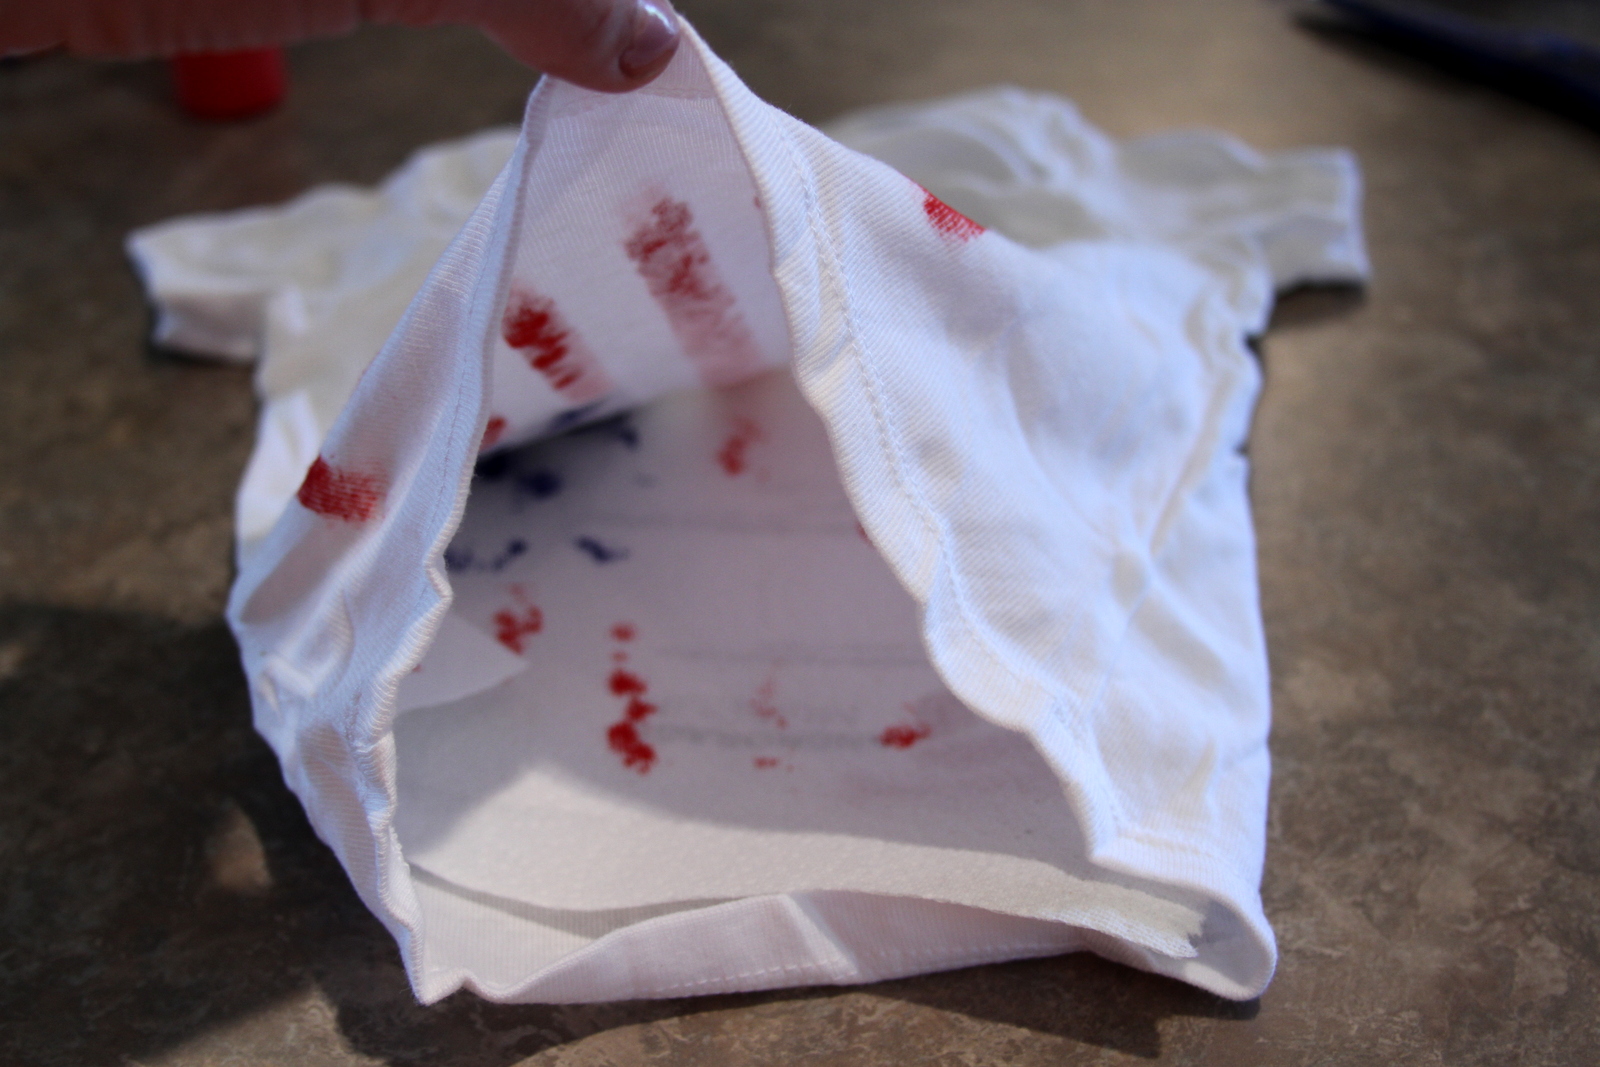
place thick scrap paper into the body of the shirt to keep paint from bleeding through onto the back of the shirt.

#2
tape a rectangle for blue portion of the flag, and fill in with paint. Pull tape off carefully but quickly to ensure clean, straight lines.

#3
Tape the lines for the red stripes. I did three red stripes under the blue portion and three long red stripes for the body of the 'flag'. Fill in with paint and peel off the tape:
[see why you need the scrap paper?]
#4
Admire you DIY handiwork and then set somewhere safe to allow the paint to dry completely for 24 hours before washing or wearing.

I also made one more with a different design, which I think turned out cute too. I'm not a very artistic person but I still love to do creative things, so it was really fun to work on this little project.


They look adorable on him and I can't wait to see him waving a little flag in his 4th of July shirt this weekend!